Thanks so much for stopping by and visiting. Hope you find something to make your creativity bloom!

Thursday, April 29, 2010

A Gift for Mom

"Other things may change us, but we start
and end with Family."


You have probably noticed by now that I like quotes and so I am starting my post for this week of Mothers' Day inspiration off with another one of my favorites. Family really is what it's all about and I'm sure many of you would agree, where would our families be without our moms? And so in honor of our moms and how much they put into making a family work, here is a simple gift you can make for the mom(s) in your life to show them your appreciation.


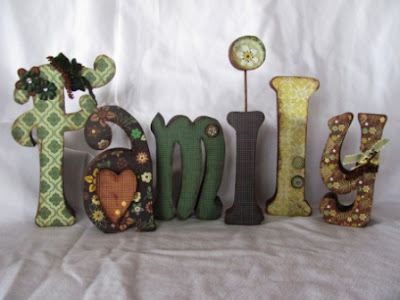
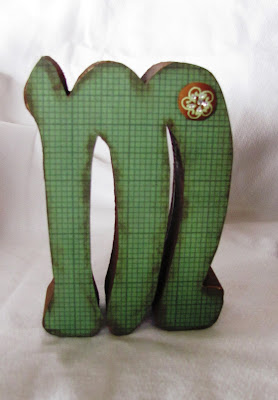
I found these letters at a very cool wood crafts store in Salt Lake City, Utah-- The Wood Connection and the unfinished letters are available to order from their website. Many craft and hobby stores also carry different types of unfinished wood and paper mache letters that would work for this project. Just make sure the bottoms of all your letters are flat so that they will stand up when you are finished. I first painted the sides and back of my letters using a dark brown craft paint.

After letting those dry thoroughly I was ready for the paper-- I chose the Basic Grey Origins lines because its colors just happen to be the exact colors I have used in my family room (the designers at Basic Grey must have really good taste! Ha-ha). I chose the six patterns I wanted to use and then for each letter I turned the pattern paper face down, put the letter face down on it and traced around the letter. Then I cut out each letter from the paper by going just slightly inside my traced lines to make sure that the paper would not overlap the wood edges of the letters. This might sound like it took a long time but actually only took me about 15 minutes to trace and cut out all the letters (that, however, does not count how long it took me to decide which patterns to use and in which order! I sometimes analyze things much too long!)


After cutting out all my paper, I glued them to the wood using good old fashioned glue sticks. I prefer Scotch brand gluesticks and I put a layer of glue on both the back of the paper and the front of the wood to make sure and get a good bond. I know there are a lot of types of adhesives out there that would probably work for this but I have tried liquid glues and Modge Podge for paper onto wood and sometimes the paper will wrinkle, which is always frustrating. I have never had any wrinkling with glue sticks and so I stick to those for adhering paper to wood. Once the paper was glued, I used a sanding stick to go carefully around some of the edges and filed back any paper edges that were overhanging the wood. Do this very carefully so the paper will not rip and tear off more than you want it to. Then I distressed all around the edges with Tim Holtz Distress Ink in Vintage Photo. I found that the ink pad and any ink daubers were still too big for some of the small corners of the letters so I used a small paintbrush and "painted" the ink on.


Finally, I added just a few embellishments because I just couldn't help adding a few fun things (though I tried not to overdo it!) I tied a little ribbon to match on two of the letters and added some Prima flowers on my "F." Then I used the Basic Grey Stitched Brads that match the Origins line (these are so yummy-- fabric and rhinestones, so cute!) to embellish the "m" and the "l." I simply cut the fasteners off the back of the brads with a old pair of scissors and then attached them with glue dots. This really was a quick and fun project to make and I know any mom would be delighted with the thought and effort behind a handmade gift.

Here is the finished project displayed in my family room with some family pictures-- guess I will have to call this one my Mothers' Day gift to myself and go get me some more sets of letters to make to give away. In honor of all you moms out there (and grandmas, aunts, sisters, cousins, neighbors and friends) and your tireless, loving efforts to take care of your families-- have a truly wonderful Mothers' Day!

Make sure to check out this and lots of other Mothers' Day inspiration at The Beary Scrap Design Team blog and also don't miss out on the chance to register for our "Beary Sweet" candy-- it's amazing!

Thursday, April 22, 2010

April Showers???

When I found out the topic for this week's Design Team projects at The Beary Scrap, images of lovely spring rains came to my mind-- a light soft rain that greens up the grass and has drops that gather on the new petals of flowers and trees. Rain you can go out, splash around and play in. You know, like Gene Kelly dancing down the street to "Singin' in the Rain."

Unfortunately that kind of rain doesn't really exist in Southeast Idaho. Spring here is quite sporadic-- a few days here, a few there with lots of cold wintry days in between where there could be anything from wind to freezing temperatures, hail storms to actual snow. And so my layout depicts a true "April Shower" in Idaho.


I also used the sketch from "Oh Alice" this week (pictured below, make sure you head over to their blog to check out more ideas!) but instead of making a card, I rotated the whole thing 45 degrees and then made a 12 x 12 layout. I really enjoyed this sketch as it was fairly simple and encompassed just basic shapes-- this gave me a great place to start but left lots of room for my own ideas to take over.


I also used Basic Grey's Kioshi line this week-- I am starting to think Susan and I share a definite connection with the papers we pick out! I used Lilo for the long horizontal rectangle and Motochi for the larger vertical rectangle. All of my pictures and journaling are matted on the back side of Lilo and Water Lily. I just love these Kioshi papers-- they have such light, pretty pastel colors mixed with BROWN, probably my all time favorite go-to color for scrapping. The patterns vary a lot too, from florals little and big to dots, stripes, plaids and other geometric designs, making these very versatile papers.

One of my favorite things about spring is the tough little daffodils, tulips, crocuses, etc. that poke their heads up through (in Idaho) the snow and brave the cold in hopes of some sunshine. So I just had to have some tulips on my LO. I used a paper piecing pattern found at the Scrapbooks, Etc. website that I downloaded for free. It was very simple and fun to do. I used both some Bazzill cardstock and some of the Kioshi paper to make the tulips, both worked great. After wetting and bending the edges of my flowers as they instruct, I also chalked around the edges to give them a little more dimension (I have Pebbles, Inc. chalk in bright colors). Then for the snow!


I originally just used some Stickles but decided that didn't really look like snow, just sparkly and so I pulled out some DecoArt SnowTex that I have used when making Christmas decorations. I had honestly never thought of using it on paper before but I think I am now hooked and can see using it on all kinds of Christmas and playing in the snow type pages. I applied the SnowTex with a small paintbrush BEFORE attaching the flowers to my page-- this turned out to be a very good plan as when I put some more snow on my title letters that were already attached, it was hard to keep it from getting on the cardstock. When the SnowTex was dry (about 20 minutes) I used a little Stickles in Icicle over the top to give just a little sparkle and I love how it turned out!


I added some letter stickers for the title, with a little rickrack for good measure, and a few pearls along the edges of my Kioshi rectangles to finish it off. My April Shower page is finished-- now all I have to do is be brave, poke my head out through the snow and wait for the sun to shine!


Check back tomorrow for some more April Shower inspirations by The Beary Scrap Design Team! And while you are here make sure to get entered in the running for Kimm's FABULOUS BLOG CANDY! I have never seen such a great assortment of scrap goodies, all coordinated too, being given away. So make sure to become a follower of our blog, post the blog candy on your own blog with a link back and then come back here to leave a comment by the blue frog. Good luck!

Wednesday, April 21, 2010

The Yummiest Candy You've Ever Seen!

Kimm, the wonderful owner of The Beary Scrap, has posted the most awesome blog candy! Just take a look at all the great scrapbook goodies she has prepared for one lucky winner!
There is over $100.00 worth of sweetness in this blog candy! It includes:

1 Martha Stewart Border Punch
Labels 11 Nestabilities
1 Magnolia Tilda with Spring Bundler Stamp
1 Magnolia Elegant Heart Stamp
1 6"x6" Basic Grey Kioshi Paper Pad
1 Pack of Prima Vines & Butterflies
1Package of Prima "Say it in Crystals" Centers
3 Stickles Glitter Glue (Waterfall, Diamond, and Stardust)
Assorted KaiserCraft Pearls (coordinates with Kioshi)
1 jar of "Summer" Flower Soft
Gorgeous assortment of lace and trim
Crochet Flowers from my dear friend Leslie
100+ lucious mulberry paper flowers in various colors and sizes.
To have a chance at winning all this fun stuff, just do the following:

2. Become a follower of our Design Team Blog. If you don't have a google account, sign up for one because a google account is free.
3. Spread the word about our "Beary Sweet" Candy. Post it to to your blog with a link back to our Design Team Blog. (Sidebar images with links are acceptable).
4. Head on back to our Design Team Blog and sign your name to our Inlinkz tool below. Post a comment too if you get the chance. It really makes us *SMILE*!

You are are done. May sure you've completed all 3 steps to qualify for our Blog Candy. Entries will be accepted until Wednesday, May 5, 2010 at 11:59pm Eastern Standard Time. Our lucky winner will be announced on Friday, May 7, 2010.
This candy rocks so make sure you get your name entered for a chance to win and thanks for stopping by The Beary Scrap Design Team page!!!

Sunday, April 18, 2010

Sketchy Thursdays had a few bonus sketches this month and here is the one for the Blog hop they had this weekend:


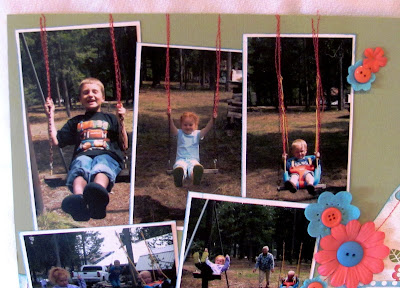
And here is my take on the sketch-- it took me awhile to figure out what do for the pennant banner across, I wasn't sure I liked it, I think it would have worked fine for some sports pics but that wasn't what I was using. So I tried some green net instead and decided I liked that. Cute pictures, that was a really fun week in Island Park at the cabin!

Thursday, April 15, 2010

Thursdays at the Beary Scrap!

Do you feel it? Are you driving around with your window rolled down? Have your broken out your summer sandals from the closet? Spring is, I think, finally here! (Even in Idaho, where it sometimes feels like we go directly from winter to summer without much in between.) Hopefully wherever you are, the grass is starting to green up, the sun is shining and the birds are singing. And what better way to celebrate those beautiful spring days and chirping spring birds than with some cute little birds on your scrapbook pages?

I had so much fun making my layout this week with the brand new Pink Paislee 365 "Degrees". I love, love, love the colors in this line! They are bright and fun without being too overwhelming. Perfect for spring or summer pages, boy pages, outdoor pages or whatever else you can imagine. Be sure to check out this line, along with the other super cute new Pink Paisley lines-- Queen Bee and Bayberry Cottage.


I used some aqua colored Bazzill cardstock for the background of my pages and then layered several sheets from the 6 x 6 paper pad of the 365 Degrees collection. This paper pad is so awesome! You get 30 sheets in 10 different designs for only $5.00! This way I got to try out all the fun patterns from the line but didn't have to buy full 12 x 12 sheets of each. Then I used the round sheet from the same line and split it into two different pieces for each side of my layout.
I remember when I first started seeing these new shapes in 12 x 12 sizes-- circles, scallops, flowers, hearts, brackets-- and I thought "Yeah, those are stinkin' cute, but what do I do with them?" Well, don't be afraid to cut them apart! I used about 7/8 of my circle scallop page and placed them at different angles on either page for variety. Also, if you are making a single 12 x 12 page layout, don't be afraid to just use the shape for your background paper-- who said a layout has to be square anyway?


Once I matted my pictures, also on some of the 6 x6 sheets, I used several of the 365 Degrees Punch Out Die Cut Tags as accents along the edges. All the die cuts and papers are inked around the edges with Tim Holtz Distress Ink in Broken China. On top of the tags are some Bazzill buttons which I love because some of them have lines etched across them, and a little of the Bazzill Tulle in Parakeet that is sold by the yard. Usually, ribbon is a definite must-have for me on a layout, but I thought the tulle fit the light spring feel of the papers and gave some variety from my usual supply choices.


I created my birds by cutting two Paisleys on my Cricut using the "Stretch Your Imagination" cartridge. I chose the Blackout option and reversed the paper for the smaller bird so that the two are facing each other. The wings are made by punching hearts and the beak by just hand cutting a tiny triangle. Using a fine tip black marker I traced around the bird bodies, added legs and eyelashes and then googly eyes to top it off. The last step was to stamp some black flourishes for the tail feathers-- I liked the flourishes so much I added quite a few around the edges of the cardstock too.


I hope you liked my winged creation for this week and that your neighborhood is full of some spring birds that are singing to you! Be sure to check back tomorrow for more winged things at The Beary Scrap Design Team!

Thursday, April 8, 2010

Have you ever had one of those moments you just wanted to freeze and hold on to forever? One of my favorite quotes is "Life is not measured by the number of breaths we take, but by the moments that take our breath away." This is one of those moments. My kids have had the great opportunity to know all four of their Great Grandmas- a very unusual occurrence, I think, and these priceless pictures showcase part of a fun weekend spent with my maternal grandmother at her cabin in Island Park, Idaho last summer. When I heard the theme for our posts this week at The Beary Scrap, I knew that these were the perfect pictures for a Bloomin Fun' page!

The background of my layout is Bazzill Lily Pond. Then I used one piece of Daisy Bucket's Playful Katy and cut it in half around the swirls, placing half on each side of my layout. I agree with Susan, who used this same paper earlier this week-- this is an incredible textured paper! It's double sided, which I love because you get two patterns for the prize of one!, and you'll be really impressed with the lovely weight and texture. I inked the edges of the Daisy Bucket paper with Tim Holtz Distress Ink in Broken China. Then I machine stitched around these pieces of paper before placing any of my pictures.


I matted all my pics on plain white cardstock and inked the edges again with the Broken China ink. I used some more paper from the Daisy Bucket Playful line, Gabby, and punched some large scallops to put behind my pictures. After placing my pictures on the layout, I machine stitched down from the top onto my pictures and over the chains of the swings to make it look like the kids were swinging right from the page. I went over each line three times to give it enough dimension to really stand out. I love machine stitching on my layouts-- it's so fast and easy and really gives it something extra. I hardly ever use my sewing machine for actual material-- though I could probably patch something if I absolutely had to :)


To finish up, I had to add some BLOOMS, of course, and I'd have to say, I am addicted to flowers so I just raided my stash and used up some felt blooms from Heidi Swapp, some large paper blossoms from Making Memories, and tiny flowers from Prima. Buttons for the centers complete the flowers. I added the title using letter stickers but replaced the "o"s in Bloomin with little flowers.


I also added to my layout the poem, "The Swing" by Robert Louis Stevenson (follow the link to find a copy) which my grandma memorized when she was in elementary school and was repeating to my kids as she pushed them.


This was a really fun layout for me to make and I hope you enjoy it! It took me on a little trip down memory lane which, as I am sure you all know, is one of the reasons we scrapbook-- to remember those moments that take our breath away. Just last Saturday, my kids lost one of their great grandmas as my husband's paternal grandmother passed away from leukemia and so my trip down memory lane while I was scrappin' was a little bittersweet. My challenge to you all is to get out, make some Bloomin' fun memories with those you love, capture those moments with your photos and then scrap 'em so you can hold onto them forever!


Be sure to check back later this week for more inspiration from the Beary Scrap!

Tuesday, April 6, 2010

Sketchy Thursdays

Here is the sketch from Sketchy Thursdays this week:


And here is my take on the sketch-- I took these pictures last summer with my sisters in Island Park, Idaho and have been waiting for a chance to use them. The sketch only had one photo but I just can't stand to have a page with only one photo so I matted my four together. Such pretty flowers!


Thursday, April 1, 2010

Thursday at the Beary Scrap!

Here comes Peter Cottontail, hoppin' down the bunny trail-- well, at least here comes Bella Bunny and she is adorable. I also used one of The Beary Scrap's newest acrylic patterns and made my own Tear Bear critter to adorn my Easter layout.

I started this project by making my little Bunny-- Kimm's patterns and instructions are absolutely wonderful! They make perfect sense and after reading them I thought, "Yeah, I can do this." It was really easy and fun. I am excited to try another Tear Bear Critter soon and look for Kimm's brand new pattern, Emma Elephant, coming soon! After piecing and fluffing my bunny using her Tear Bear Fluffing set and guide, I was ready to work on my layout.

The background of my layout is a simple cream cardstock and then I used Basic Grey's Nook & Pantry collection. These papers may have names that make you hungry like Cornbread, Fruit Salad and Lemon Meringue pie but definitely think outside of the kitchen when deciding what to do with these oh-so-pretty papers. The colors are just awesome spring colors, they were perfect for Easter. Some of the patterns I used are Tea Cakes, Beaters, Dishes and Cookbook.

I added some cream lace, rick rack and also machine stitched on the edges for some added detail. I used the Nook & Pantry element stickers ,added a few pearls to accent the stickers and then layered them with some beautiful Prima flowers .

The final step, of course, was to place my Bella Bunny on the layout. I used Alene's Super Tacky Quick Dry Glue to attach it to my layout (the same stuff I used to glue her together) and then trimmed down a couple flowers from the Nook & Pantry stickers topped with some more pearls to place on top of the bunny. Cute, cute!
Well, now that I have finished scrapbooking last year's Easter egg hunt, I have about 3 days to plan this years! I hope you all have a wonderful Easter weekend and enjoy some quality time with your loved ones. Be sure to check back later this week for more great Easter ideas from our Beary Scrappy Gals!