Thanks so much for stopping by and visiting. Hope you find something to make your creativity bloom!

Thursday, July 29, 2010

Merry Christmas at The Beary Scrap

It's Christmas in July this week at The Beary Scrap and my project is a trio of quick and easy treats you can make for the holidays-- I am always looking for something to give to friends and neighbors and the easier the better, than I can actually enjoy the holiday season!


Treat #1: A Mug Card with Hot Chocolate and a candy cane.

(Go to this link for a free downloadable mug card pattern).

Treat #2: Folded Candy Box


Treat #3: Twist Container


(Visit this blog to view the original instructions and pictures for a twist container)


Visit The Beary Scrap Design Team blog for more pictures of my project and some instructions. I used Basic Grey's Eskimo Kisses line for all of my Christmas treats, which are all currently on sale at The Beary Scrap! And while you're there, check out our Beary Sweet Challenge and win an awesome prize pack from The Beary Scrap.

I wish you all the best of luck in your holiday planning this year (yes, I know it's July but remember I said it's never to early to start!)

Tuesday, July 27, 2010

Winter Beauty in July

Here's a sketch from a new challenge blog I found-- they have a brand new sketch every week but I have all month to complete and post them! I used this sketch:


To make this cute winter layout:

I had as much fun embossing on this page as my kids did playing in the snow last January, good thing they were all in bed when I was working on this page!

Saturday, July 24, 2010

A Cute Frame for some Cute Girls

Wow! I am on a roll this week, maybe it's because all the sports camps and family reunions are over, my kids are happily occupied playing with their cousins who are visiting, we are trying to enjoy the lazy days of summer and I am spending a lot of time in my scrap room! Yea!

Anyway, I made this little frame to put in Lindsey's room with this cute pic of her and her two cousins (sisters!) in Disneyland. The frame only cost me $2.00 and was so easy to cover with some pretty Bo Bunny Persuasion paper. I love the pink and brown!

Friday, July 23, 2010

Sketchy Thursdays August Guest Designer Sketch

Here I go again, entering a layout for Sketchy Thursdays Guest Designer for August. They have so many awesome entries, I don't know how they ever narrow it down. People are so creative, I just love it!

Here is their original sketch:


And here is my take on the sketch:


They had two guidelines for this entry: (1) include yellow-- got it! Love this new Bo Bunny SunKissed paper, just grabbed it the other day and it's got yellow! and (2) Include a handmade embellishment-- wow, this was fun! I made the faux folded & stitched ribbon across the middle and my banner title.


Here is my layout expanded to a two page spread, I almost always make a double 12 x 12 layout and this sketch was really easy to extend onto a second page.


What a fun layout to make!

Thursday, July 22, 2010

BoBunny Card Sketch

I love sketches!!!!! Bo Bunny had this cute card sketch on their blog this week:


And so I used the Unforgettable line (I love and hoard this paper!) to make this card for a friend of mine who has had a great experience this week:


Here is a view of the inside-- I like it simple inside so there is lots of room for writing.

Dancing at The Beary Scrap

It's Thursday at The Beary Scrap DT blog and my day to share! The DT challenged ourselves with a crazy color combo picked my yours truly! I don't know why, but I just thought Pink Yellow and Brown sounded fun-- though I have been nervous that this might end up being a completely stressful color combo and my other DT friends would want to strange me! It seems to have worked okay-- check out our blog to see Susan and Elise's darling cards so far this week and below is my layout:


These three colors fit the photos I took of my 6 year old daughter Lindsey's ballet class just perfect! I used the backside of a pink Bo Bunny Double Dot cardstock for the base on the right hand side-- the back of these double dot papers have a nice textured look, with just slight color variations in the paper to give it some interest. To that I added a perfect pink, brown and yellow scalloped circle paper from My Little Shoebox's "Whoo Loves You?" line and a strip of brown Double Dot cardstock from Bo Bunny.


I just used plain white cardstock for the left hand side, since it's mostly covered with pictures anyway (I love to see how many pictures I can get on a page-- I like them to look good, but I definitely want to make the most of my space! ) At the far left hand side I added a strip of Bo Bunny Calypso Love paper and then a strip of brown Double Dot that I punched with a Martha Stewart border bunch. After adhering all my ballerina pictures, I added one more small piece of brown Double Dot and then used My Little Shoebox tiny alphabet letters to add the names of all the girls in Lindsey's class.


Every ballerina page needs flowers! And so I added some Prima Sprites in pink and brown to my page. Behind a few of the flowers I added a little pink tulle from Bazzill, inked the edges of the pink ones with Chestnut Roan ink from Colorbox and added a little Cotton Candy pink Stickles to the petals of the brown ones.


The flower centers are pink brads from Doodlebug and yellow brads from Bo Bunny. These Bodacious Double Dot brads from Bo Bunny are so cute! They are fun, bright colors and most of the brads have different designs, making them really versatile, plus there are 24 brads in a package (12 large, 12 small) for only $4.00. What a deal!


Lastly, my title uses self adhesive chipboard letters from Bo Bunny, plus some more of the tiny alphabet stickers from My Little Shoebox. Some stickles around the edge of the chipboard letters and a little tulle finish it off. Actually, I'll let you in on a secret! I had already used the "d" from this set of letters so I substituted an "a" and cut an "l" in half and stuck them together. Then I put the tulle bow right over the seam to hide it and it looks just like a "d." Get creative with your letter stickers to make them go further!


I hope you liked my Pink/Brown/ Yellow creation and maybe you'll want to include those colors in whatever you're making this week! Over at The Beary Scrap we're in the middle of a sketch challenge to come check it out, make something using our sketch and enter it in our Beary Sweet Challenge! Become a follower and link your pic before midnight, July 31st for your chance to win an awesome prize pack from The Beary Scrap. Have a lovely week and go out and DANCE!

Wednesday, July 21, 2010

A Sketch of Indoor S'mores

It's been awhile since I had time to make a Sketchy Thursdays sketch-- summers are always crazy! But, yea! I had time today and so here is their original sketch:

And here is my take on their sketch, using some pictures from our chilly Memorial Day weekend in Island Park this year and some super cute paper from the Bo Bunny Roughin' It line:

I was especially excited about my marshmallows! This cute paper already had the marshmallows on roasting sticks and then I added some Snow-Tex (good for more than Christmas decorations!!) and inked over them with a light brown ink. I think it looks just like a perfect toasted marshmallow! We love S'mores!

Thursday, July 15, 2010

Hey Buffa-lopes! -- Thursday at The Beary Scrap

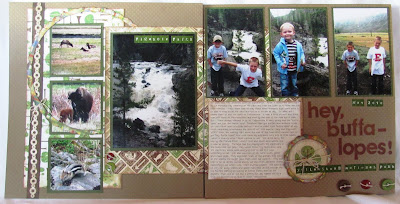
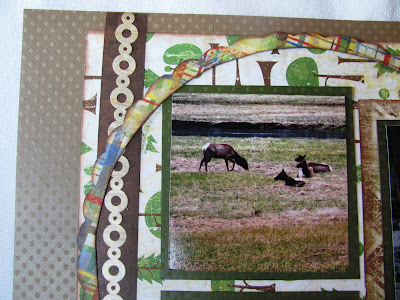
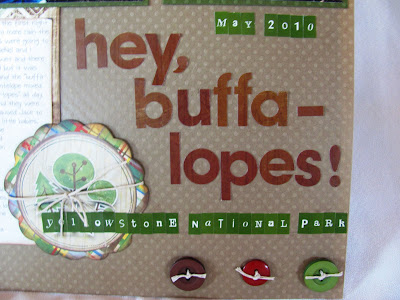
So, this title probably needs some explanation-- I'm sure most of you have never heard of a "buffa-lope" but those of us traveling with my 3 year old to Yellowstone National Park Memorial Day weekend this year heard about them all day long! Jace has never seen a buffalo before and he somehow combined buffalo and antelope into one word, which we all thought was very cute! There were so many buffalo, many with tiny babies since it was springtime, and when they walked right down the middle of the road, Jace would yell "Hey Buffa-lopes!"


This week at 
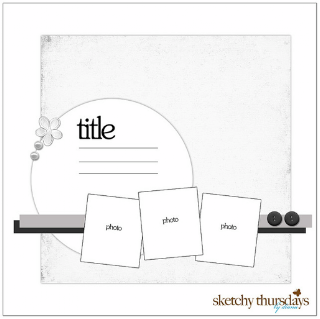
The Beary Scrap is a sketch challenge and I used Kimm's awesome sketch this week to capture Jace's cute words and the story that goes with it. To turn that sketch into a 2 page layout, imagine that I grabbed onto it with both hands and stretched it horizontally until it would cover a two page spread. My elements are a bit bigger, spread a little further apart, allowing me to use just that great sketch to quickly design two scrapbook pages.


The background of my layout is 
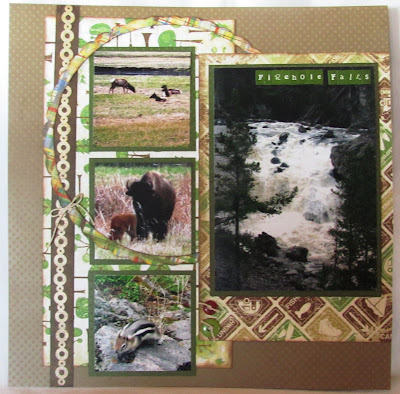
Bazzill's Swiss Dot Cardstock. This cardstock differs from Bo Bunny Double Dot as it has actual tiny embossed dots all over it, giving it a really nice texture. Then I used patterned papers from Bo Bunny's brand new line, Roughin' It, for the rectangles in the sketch-- enlarging and stretching them so they reached over both pages. The edges of all my papers are inked with ColorBox ink in Chestnut Roan. This new Bo Bunny line is perfect for any type of outdoor summer activity-- camping, hiking, four wheeling, sightseeing, even making smores! It also has tons of cute matching embellishments and stickers-- make sure to grab some for your summer adventures!


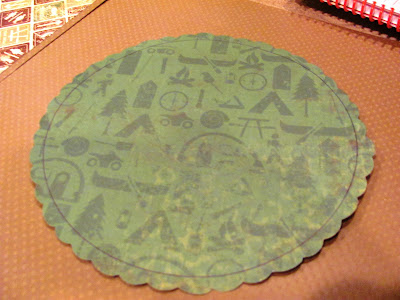
For my scalloped circle, I wanted to use just the outside edge and so I traced the size circle I wanted, then cut it out using scalloped scissors. Then I went back with regular scissors and cut out the inside of the circle so I had just the scalloped edge left.


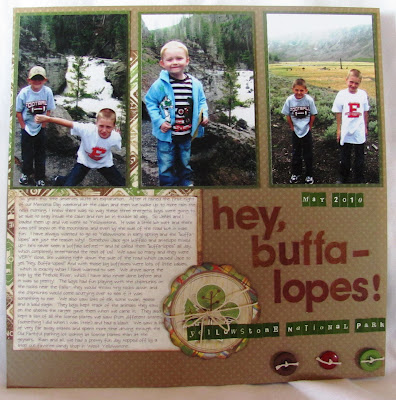
Then I used only about 3/4 of the circle and wrapped it around some of my pictures. This was a really good way for me to add a touch of red & blue (since the rest of the page is mostly green & brown) from one of the patterened papers without it being too much.


I used stickers from both the alpha combo sheet and Catching Memories sheet to embellish the page, as well as some buttons from Basic Grey tied with hemp cord. The title is from the Bo Bunny alpha combo sheet which is so handy to have a sticker sheet that has both letters and some shapes. I also used tiny letters from My Little Shoebox to add the subtitles and I absolutely love these tiny alphabets. They come with so many letters for such a great price and it includes several different fonts which are fun to mix and match.


Oh, I just love sketches and this one was so fun to work with! Head on over to The Beary Scrap and check out Kimm's sketch. I hope you will join us in our sketch challenge during the next two weeks and show us what you can create using this sketch. Hope you are all having a great summer, enjoying the great outdoors and that some of you out there might just see a "buffa-lope" or two!

Thursday, July 8, 2010

Emboss it Challenge at The Beary Scrap

Hope all of you out there had a wonderful Independence Day weekend and got the chance to enjoy family time and some different celebrations. My Beary Scrap post this week is again patriotic, direct with my fireworks shots from last Saturday night (that has to be a record for me, getting them edited, printed and on a layout in only 4 days!) My extended family had a great time celebrating the 4th in Island Park, Idaho and we watched fireworks from the boat on the reservoir with a beautiful backdrop of mountains and a gorgeous Idaho sunset. What could be better?

I used the Starlight line from Pink Paislee again this week and I can't say enough about how cute these papers are! They are all double-sided, giving you a great selection of patterns, and are just awesome colors. I love the stickers, both shapes and alphabets, too. They are just slightly glittered which makes them perfect for some fireworks pages. For this layout I used the round diecut paper and cut it in two to spread across both my pages. All the papers are inked with Tim Holtz Distress Ink in Faded Jeans and matted on the different Pink Paislee papers. Once I had laid out my background papers and all the pictures, it was time for embossing!

I really had a great time embossing this page-- it's something I don't do very often because it is so messy (and my kids always want to help which makes it messier!)-- but I am always pleased with the results. I used some fireworks stamps and red, gold and blue glittered embossing powder to make my own fireworks across the top of the page.


I also embossed different parts of my title, starting with another stamp for the "4th" and embossing it in the red powder.


I chose chipboard letters for "July" and went around the edges of the letters with an embossing marker before adding gold powder. I really love how the letters turned out though this was a bit tricky to heat them without heating my fingers too! And yes, my scrap room is now covered in glitter so it was definitely messy but worth it!

So now it's your turn-- join our "Emboss It!" challenge (wet or dry) and show us what kind of beautiful embossed projects you can come up with. You just might win an awesome paper pack from the new Bo Bunny Block Party line (and it's so stinkin' cute, I have to have it!) Don't forget to check out the Embossing Powders and stamps at The Beary Scrap and especially Embossing Folders which are on sale! I can't wait to see what you create!

Thursday, July 1, 2010

Hooray for the Red, White and Blue!

This week at the Beary Scrap is our Photo Inspiration challenge with this Patriotic picture:

I majored in History in college and taught American History to high school juniors for 5 years. My favorite genre of books is historical fiction and my entire scrapbook room is decorated in Americana stuff-- so, needless to say, I am a bit of a patriotic fan and was so excited about this week's project!!


My patriotic-inspired project is an altered frame that was a total blast and easy to make! I used the new Starlight line from Pink Paislee and it is just super cute! First I covered some Chipboard Letters with 3 of the patterns from the Starlight line. I got these letters at my local scrapbook store which made it super easy because I didn't have to cut out mine own. However, you could easily make your own by printing out USA on your computer in the size and font you want, then cutting them out and tracing them onto chipboard. I distressed all the edges of the letters with Tim Holtz Distress Ink in Faded Jeans.

Then I laid out my covered chipboard letters on top of a red 8 x 10 frame that I got at a local craft store. I wanted mine to overlap a little bit to give it more of a 3-D look so the "S" sits on top of the "U" and the "A." Once I decided where I wanted the letters to lay, I stuck them together with glue dots (not onto the frame yet, just together.) Then I added some embellishments-- scraps of ribbon, tags from the Starlight Element Stickers (these are so stinkin' cute, they have a light glittered finish and what a great deal, there are so many pieces to choose from!) I also tied some twine through Doodle Bug Buttons, Uncle Sam Assortment, and added those.


Once I had all my embellishments attached to the chipboard letters, I sprayed the whole thing with Pearl Gimmer Mist, this is a very light glitter that is so pretty. I know it's hard to see the shine in the picture but it looks great in true life.

While my letters were drying, I cut a piece of Bo Bunny Double Dot cardstock to fit inside the frame and added some bracket stickers from the Starlight Element Stickers and "land that i love" from the Alphabet Stickers to the cardstock. This piece went inside the frame.


I
also added a few of the Element stickers-- some tiny stars and tickets-- to the front of the glass before placing my letters. This gives it a lot of different layers-- there is paper and stickers inside the frame, sickers on the glass, the letters on top of the glass and then the embellishments popping off the letters. Finally I attached my letters to the glass and the whole thing was finished.

I love my finished frame and I already have a whole American room to put it in! You could make a frame like this for any holiday, or do a name for a child's room.


Make sure to join us in our Beary Sweet Challenge and see what Patriotic-inspired projects you can come up with! Have a wonderful Indepence Day!