Thanks so much for stopping by and visiting. Hope you find something to make your creativity bloom!

Friday, June 24, 2011

O, What a Flower!

Who knew there were so many ways to make your own flowers? I know you have seen a bunch this week and they are all fabulous! Today I have one more, very simple!, way to show you to make your own flower embellishment.

If you are like me, you have lots of letter stickers laying around that don't always get used (I know, especially those weird letters like q and x!). This is a great way to utilize some of those stickers and make a cute flower at the same time.

For this flower I used some letter "O"s for my flower petals. You will need a small piece of cardstock (circle or square) to anchor your petals to.


Snip one side of the O and then overlap the cut apart ends and stick it onto the small piece of cardstock.


Repeat with more O's until you have completed the petals all the way around.


Push firmly on the petal centers so they will stay (or anchor them with an extra glue dot). Then attach a button for the flower center and wa-lah! Super fast, cute and easy flower!


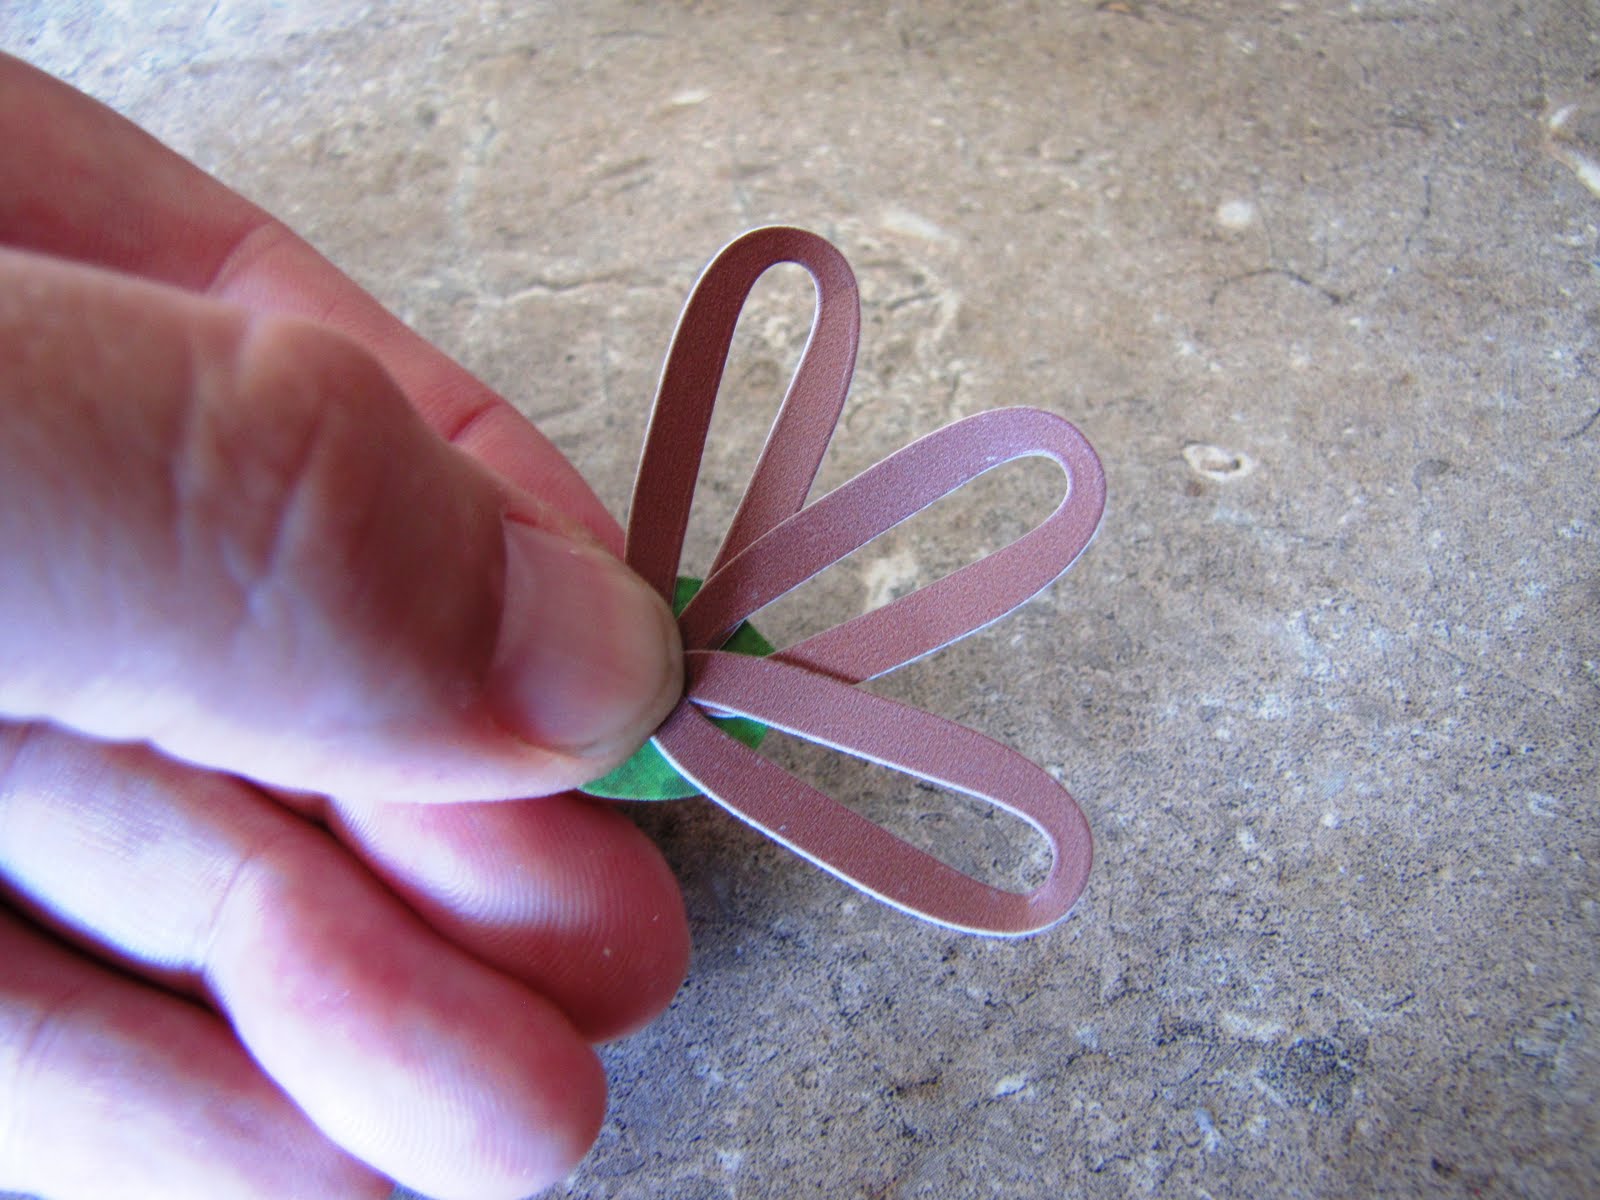
Now, you may be thinking-- okay, but "O" is not one of those weird leftover letters and I agree, I generally don't have a lot of "O"s left so here is one using a "w"--

On this one I didn't snip anything, just over lapped the ends of the "w" onto each other to form sort of a double petal and then stuck it on the cardstock.

And another one with a "Q"-- I always have those left! For this one I snipped it right where the little piece crosses the circle and then trimmed off the ends of that little piece, so basically it ends up looking like an "O."


Here's my completed layout with my letter flowers on it. I used Bo Bunny's Roughin' It papers for all of my circles and trimmed just a square off a diecut paper from that line to put my date and flowers on.

I hope you have learned a few tips and tricks from our DIY embellishements this week! Stayed tuned until the 30th for a few more ideas and make sure to enter your own DIY project in our current challenge.

Friday, June 17, 2011

Do It Yourself at The Beary Scrap

Happy Friday all! For the next weeks at The Beary Scrap we are having a Do It Yourself Embellishment challenge-- DIY is all the rage now and I always wonder, how'd they do that?!! So for the next weeks our DT will be showing you a new DIY embellie each day. wn unique embellies so keep those entries coming!

My project for this week is this little covered notebook and matching pen-- I found it for only $1.00 at my local craft store.


My main DIY embellishment is an eyelet flower-- I saw this idea recently in PaperCrafts magazine (along with a lot of other DIYs) and was dying to try it! It was super easy to make (as long as I kept my fingers out of the way of the hot glue) and I was really pleased with the end result. If you want to try your hand at this kind of flower, here are some instructions:


1. Gather your materials--
Cardstock and circle punch (I used a 1 1/4 inch circle)
15 inches of rick-rack trim (this makes a 1 1/4 inch flower, use more if you want a bigger flower)
Glue Gun


2. Begin at the outside edge of the circle and apply hot glue around the edge, then start pressing down the rick-rack onto the hot glue, twisting it slightly to make it go around the circle. (You have to kind of twist and bend it as you go, as rick-rack does not naturally curve!)

3. Continue circle inward with hot glue and then applying the rickrack, twisting and turning to make it circle. Continue all the way into the center. Mind your fingers! I used hot glue because I like how fast it is and I'm not sure anything else would have held rickrack as it doesn't turn easily. If you used a lighter weight trim or lace I think Tacky Glue would work just fine and be less dangerous for your fingers!


4. Trim off any excess rick rack in the middle and any excess cardstock from the back circle. You'll end up with something similar to this:


Then add a brad, button or whatever you can come up with to the center for the middle of the flower. I used a brad and pierced it all the way through the cardstock circle.


A couple of other little DIY things I wanted to show you-- to make a leaf for my rick-rack flower, I punched a heart from my patterened paper and then also cut the small heart from some black lace to cover it:


I wanted to add a seam binding bow so I used white seam binding and spritzed with with Glimmer Mist to match my paper. I love how easily the seam binding can be colored and how quick it dries. After I spritzed it, I scrunched it up good and then tied the bow after it was dry.

Here's another look at my final product--


We'd love it if you'd join us and create your own project with a DIY embellishment and then enter it in our challenge for a chance to win a $20 voucher to The Beary Scrap. Click here for all the details!

Friday, June 10, 2011

Blast Off!

OOOoohhhh, I am in love with the new Seam Binding in stock at The Beary Scrap. It is versatile and comes in so many great colors! I had a lot of fun adding it to our sketch this week and using it to make my card blast off!


This sketch is just as versatile as the seam binding-- last week I used it to make a two page 12 x 12 layout and then this week brought it down to size in a 6 x 6 card. That's what I love about sketches-- they just jumpstart my brain and I can go anywhere from there!

I used Bo Bunny's Blast off papers. I really like the colors of these papers-- strong, vivid colors that are perfect for boys but could also work for some cute baby or birthday projects.


Instead of trying to find embellishments to match, I just cut my own from some of the papers (the bigger rockets are from as 12 x 12 page I got locally). All this fussy cutting does take time but it's worth it in the end as the rockets and stars match so perfectly.


For my last bit of dimension, I added that great seam binding, this time in white to simulate the cloud left by a rocket blasting off.


Be sure to check out all the colors of seam binding Kimm has available and enter your own version of our sketch in the current Beary Sweet Challenge for your chance to win a $20.00 voucher to The Beary Scrap store.

Friday, June 3, 2011

How Sweet It Is. . . .

We have a sweet sketch for you this week over at The Beary Scrap Challenge Blog and I have absolutely loved seeing the gorgeous cards my fellow DTs Patricia and Debbie have made with it so far. But I have to admit, it was a challenge for me! I really wanted to make this into a two page layout as I haven't posted one for awhile and it took a bit of thinking and rearranging to adapt it to my sweet layout.


Here is our original sketch, done by the fabulous Kimm:


Here you can see most elements of the original sketch in my layout-- I just love the triangles, big and small, across each side:


Notice how instead of centering it on one page, I stretched the sketch across my two 12 x 12 pages and then here you can see how I expanded it a little further to include more photos:


I used the Alphabet Soup Paper Girls line and the colors were perfect for my pictures! The oranges and pinks precisely matched this fun little restaurant we went to in Las Vegas where everything is bright orange and hot pink, and the ice cream sundaes cost $15 but are huge and worth every penny!


Whether your take is a card or a layout, we can't wait to see what you dream up with this sketch! Make sure to enter it in our current challenge for your chance to win a Beary Scrap store voucher.