Thanks so much for stopping by and visiting. Hope you find something to make your creativity bloom!

Thursday, June 24, 2010

Catch some Summer Fun at The Beary Scrap

"In summer, the song sings itself."
--William Carlos Williams.

Isn't that the truth? Don't you just love summer, when the days get long and lazy? When you wake up early with the sun to birds singing? (My favorite here in Idaho is a meadowlark.) Or the evenings that are still warm and beckon everyone to come outside to stay. I love sitting out on my deck in the summer evenings, watching the sunset and listening to the sounds of frogs, crickets and sprinklers in the field behind my house. Something about summertime just brings that lighthearted feeling that seems like there is a song playing in the background all the time.

My layout this week shows a fun summer day spent playing on the lake. I had so much fun making this layout--


All the papers in my layout are from the My Mind's Eye Just Dreamy 2 Collection . Remember last week? I told you I would be using them again! However, the papers I chose this week are a bit different-- still bright and cheery but this time with flowers instead of stars. There are just so many patterns to choose from in this line and they are all so versatile! Get some for your paper collection now while they are on sale at The Beary Scrap! The edges of all these papers are inked with Tim Holtz Distress Ink in Spiced Marmalade.


I made my own flip flop pattern by tracing my 3 year old's size 8 flip flop onto a piece of chipboard (then it's pretty sturdy and I can use it for quite awhile.) Then I copied my chipboard pattern in my scanner, decreasing the size just a bit to fit my layout.


I traced my smaller pattern onto the My Mind's Eye paper and cut them out. I inked the flip flops with Tim Holtz Distress Ink in Broken China and then punched 3 holes in each, one at the t
op and one on each side, using the flip flops I was wearing at the time for a guide. I added ribbon for the straps and a Prima Sprites embossed paper flower with a jewel brad center to finish them off.


For another idea on what to do with a flip flop, I made this invitation using the original chipboard pattern that I made from my son's flip flop.


I folded a piece of the My Mind's Eye
paper in half, then laid my chipboard pattern along the fold line make sure that the top part of it overlapped the line. Then I traced it and cut it out, giving me a flip flop card. I added ribbon for the straps, a flower again to embellish itand then my information to the inside:


I hope you are having a WONDERFUL summer and enjoying the summer inspiration this week at The Beary Scrap. Make sure to join us tomorrow and every week all summer as we continue to show you new projects to jump start your creativity! And don't forget to join us in our current challenge-- a color challenge of Navy, Lime & Turquoise! Post your project by June 30th, 11:59 pm EST for a chance to win a goodie pack of flowers, bling and ribbon from The Beary Scrap!
Saturday, June 19, 2010

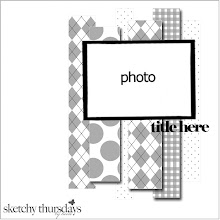
Sketchy Thursday July Guest Designer Sketch

From one of my favorite places, here is the sketch for Sketchy Thursday's July Guest Designer:


Here is my take on the sketch:


And here is my layout expanded to a double page 12 x 12 layout-- I like double layouts and so even when I use a single page sketch, I usually expand it into two pages.


I also used this layout to do a tutorial on making leather paper so if you haven't seen it yet, click here to find out how to make this fun (and messy!) paper . And make sure to check out Sketchy Thursdays for great sketches and a fun contest every week-- I WON their random prize this last Thursday! WOO-HOO!

Wednesday, June 16, 2010

Happy Fathers' Day!


Last week was Father's Day Week at The Beary Scrap. My week got a little crazy between basketball camp, dance recitals, softball practice and games and everything else so I am finally getting a chance to post my project here:

My layout honors my Grandfather-- he has been gone for almost 20 years but I still think about him often and appreciate the things he taught me. He taught me to work hard (he was an Idaho potato farmer), play hard (he loved to travel, especially abroad) and he taught me to laugh! My grandpa affectionately called my two younger sisters and I the "three squirrels" and spoiled us rotten with treats from his candy drawer and new school clothes every year. I still miss him and especially miss that my kids never got the chance to know him. What a great example and patriarch he was to our family!


Check out our Beary Scrap Design team blog for all the goodies I used in making my page!

Included on my LO is some strips of "leather" paper-- a cool way to add a masculine touch to any layout or card. To make leather paper you will need the following things:


***Lightweight white or cream (light colored) cardstock
***Walnut Ink Crystals
***1/4 cup measuring cup
***1/2 tsp measuring spoon
***Hot water
***Bowl and stirring utensil (I used a craft stick)
***Wax paper

Sounds kind of like cooking, doesn't it? By the way, an apron is also a good idea! (I realized this half way through, especially because I was wearing a white shirt!) And this is extremely messy for your hands, so if you are opposed to the ink taking two days to wear off, you might wear gloves.

After gathering your supplies, follow these steps to make your leather paper:

1. Measure out 1/2 tsp of the Walnut Ink crystals into your bowl.


2. Then add 1/4 cup hot water and stir until the crystals are completely dissolved.


3. Crumple up a piece of white cardstock (no bigger than 8 1/2 x 11) .

4. Place the crumpled paper into the bowl of ink and press with your hands until it is covered completely. Turn it around, upside down, unfold a bit to get ink into as many of the creases as possible.


5. After moving it around to cover as much as possible, carefully lift it up out of the bowl, continuing to hold the paper over the bowl so it can drip back into it.


6. Gently ring the excess ink from the paper.

7. Carefully, so the paper won't tear, unfold it and lay it out to dry on a sheet of wax paper. As you are unfolding it, if there are any spots that weren't covered, you can dip it again or spread some on with your fingers. Aren't all the lines and creases cool?

8. Repeat with more paper-- I used several different sizes and then also did some shapes, such as ready cut tags and stars that I punched. The 1/2 teaspoon of ink crystals makes quite a bit of ink so you might as well do a lot while you're making a mess! Tags and shapes would be really handy to have ready for quick cards. If you don't use up all the ink in one session, store it in a container with a tight lid and just stir before using again.


9. Let your pieces dry completely-- I left mine overnight. Here they are all laid out wet at 11:30 pm one night--

-- and here they are the next morning at 8:00 am, all dry and ready to go!


After your leather paper is dry, use it as accents on your layouts or cards any way you can imagine! I think "manly" looking accents are hard to find so here's a great way to make your own! Hope you liked my Fathers' Day page and my instructions for leather paper.


Go Fish with a Sketch!

Here is the sketch from Sketchy Thursdays this week:


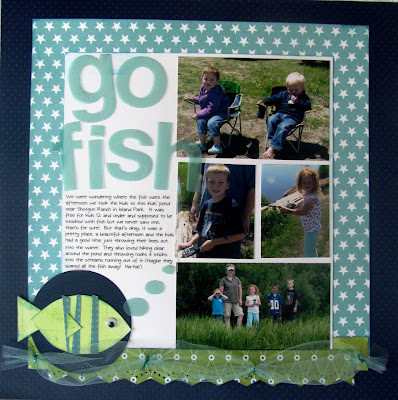
And here is my Fishy take on that sketch :)


I matted my photos all together so I could use 4 instead of the 1 on the sketch and changed the flower element to a fish! I also used this layout for my Beary Scrap Design Team project, we are doing a Navy, Lime and Turquoise challenge. Love the colors! Check our Design team blog TOMORROW for more details on our challenge and my layout plus see how I used the sketch to make a matching page so I could have a double 12 x 12 layout for my album.

Wednesday, June 2, 2010

A Slam Dunk of a Sketch

I hope you have enjoyed seeing the takes on our sketch this week at The Beary Scrap and are working on your own project based on our sketch to enter in our Challenge #3-- sketches are such a great way to jumpstart my creativity, I just love them! So take the challenge and join us, I can't wait to see your projects!

I used the sketch to make a 12 x 12 layout instead of a card-- one of the great things about sketches is how versatile they are-- enlarge it, shrink it, flip it, sub one element for another-- there are so many ways to do it! Here is my basketball themed page based on the sketch:


I started my page with some cream colored Bazzill cardstock and spritzed it with Walnut ink. Any type of spray ink, including Tattered Angels Glimmer Mist, would work for this. Make sure to let it dry thoroughly! Then I used basketball patterned paper from Moxxie for the 3 layers of the sketch (I added an extra layer of Bazzill cardstock around one of the patterned papers to help separate the black backgrounds). I love the colors of these papers! Also make sure to check out baseball and softball papers from the same company!


I used black ribbon and a Karen Foster mini license plate for the stripe across the lengthwise layer of the sketch. These license plates are so cute!


Then I replaced the flowers on the sketch with basketball rubons that I adhered to cardstock, cut out, added Black Diamond Stickles glitter glue to the edges, and popped up on my page with foam dots to add dimension. Around the top basketball, I added my title in chipboard letters.


Finally I added some random star stickers, star brads and some basketball brads from The Eyelet Outlet.


What a fun sketch! I love using a sketch to get me started and then just let my imagination take over from there, adjusting it so it fits my style and the pictures I want to include. I challenge you all to try this sketch and let it jump start your creative process this week!

Make sure to check back tomorrow for some more ways to use our Beary Sweet Sketch!