Thanks so much for stopping by and visiting. Hope you find something to make your creativity bloom!
Showing posts with label Beary Sweet Challenge. Show all posts

Friday, October 7, 2011

Free for F'All at The Beary Scrap

We have an awesome challenge going on right now over at The Beary Scrap, Free for F'All or Anything goes! There have been a lot of awesome entries so far so if you want a chance to win a $20 voucher to The Beary Scrap store, hop on over and link up your project!

My project for this week is a quick paper pumpkin you can make as seasonal decor or to use as table favors for a fall occasion. All you need is a scallop circle punch and some great fall paper!


If you want to try out this little pumpkin for yourself, follow these steps:

1. From your patterned fall paper (you could use Halloween papers for a spooky pumpkin!), punch 8 scalloped circles. My punch was 3 inches but you could do smaller or larger depending on what you have or cut them out with a die cut machine.


2. Ink the edges of your scallop circles and then carefully line them up exactly and fold them in half.


3. After they are folded and even, unfold them and cut off the bottom scalloped edges to make a straight edge. The straight edge needs to be the same on all of the circles so measure carefully. (I had a little bit of a hard time getting them even, so don't get frustrated if the first try doesn't work out perfect! Just try again!)


4. Begin attaching the circles to each other, one at time so all the scallops match up (as close as possible) and the flat edges are all together on the bottom. You may have to fold a little more and adjust as you go to get everything matched up. You also may have to trim a little off the bottom to make the pumpkin stand straight if not all your straight edges lined up. You should end up with a shape that looks like this:


5. Embellish however you want! I broke a branch off a tree in my yard for a stem and worked it through the center of the pumpkin. You could also use some wire, fabric or just more paper for a stem. Add leaves, curled up wire or anything else you like! I spritzed some seam binding with Glimmer Mist and used that for my leaves.

Happy Crafting this weekend and remember to enter your project in our current challenge!

Friday, September 23, 2011

Buttons & Pumpkins

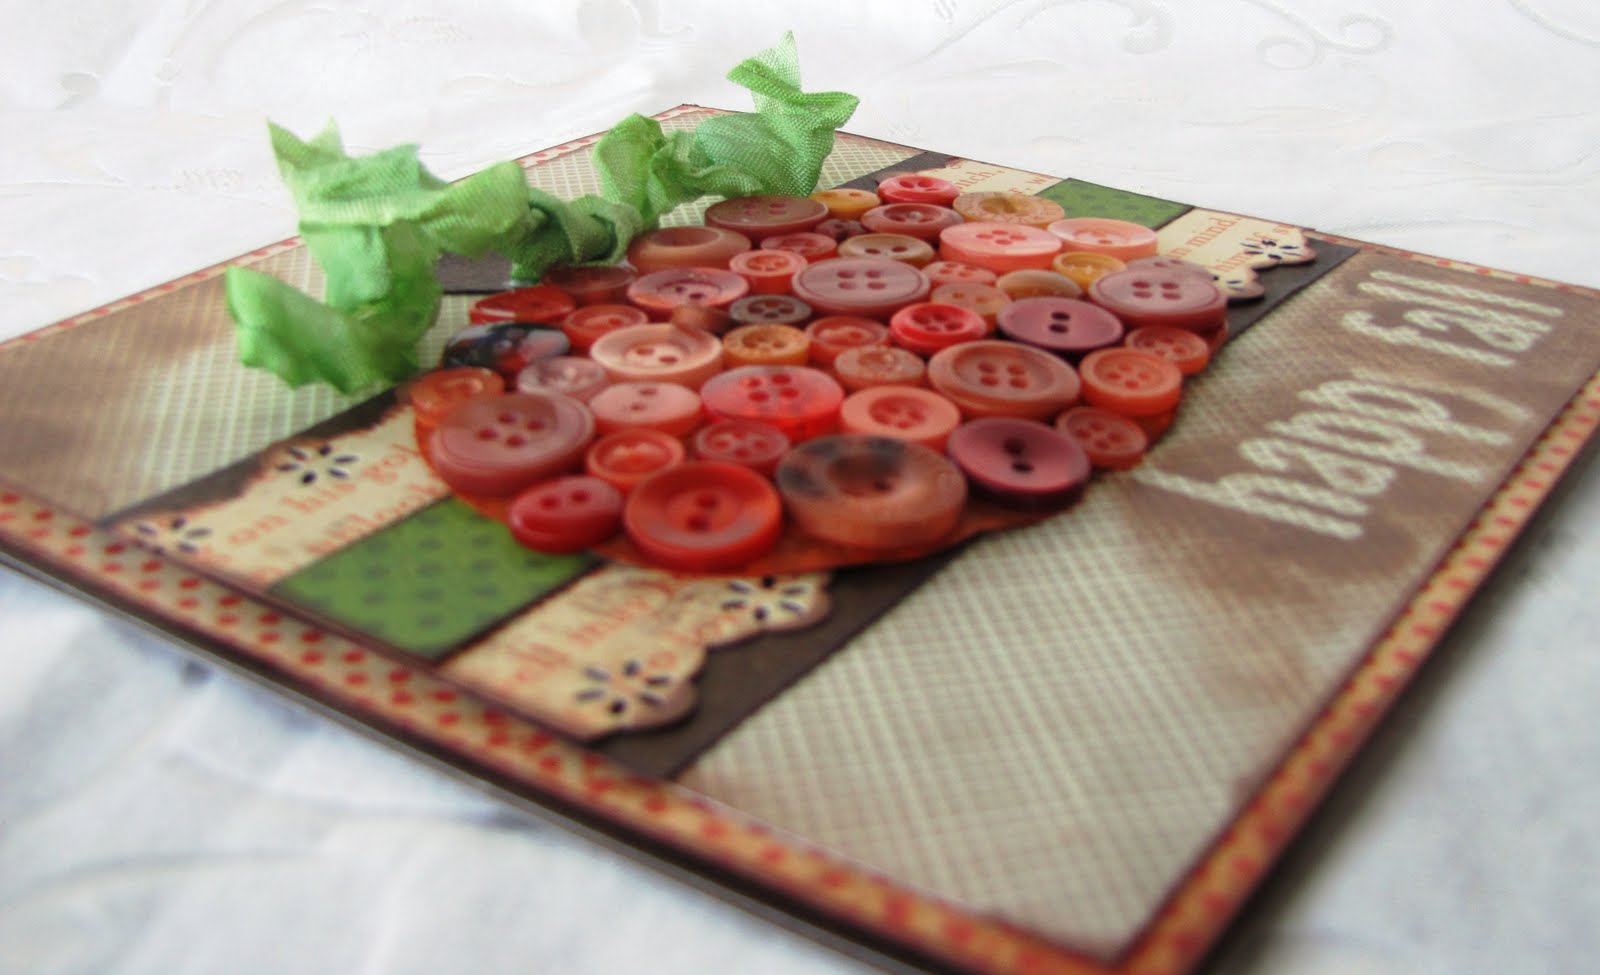
It's Week 2 of our current Beary Sweet Challenge, "Happy Fall Y'All" and the DT challenge this week was to add buttons to our Happy Fall projects. I decided I wouldn't add just a button or two, but a whole barrel full!


Or at least an entire pumpkin full! The center of my card is a pumpkin made from buttons.


To start with I found a pumpkin pattern, (you can get your own copy by clicking here), traced it onto Bo Bunny Double Dot Burnt Orange cardstock and cut it out. Then I used Tacky Glue and adhered all shades and sizes of orange buttons to my pumpkin. This is a little tricky and I found it worked the best to just put glue on a small area, find buttons to fit and then move on to the next area, adjusting as I went. Once my pumpkin was dry I could then mount it to my card.


For my card I used some of the awesome new papers from Authentique's Glowing line. I love all their 6 x 6 paper pads, make sure to check out these new arrivals in the Beary Scrap store. I made my sentiment by applying letter stickers, inking over the top with an ink dauber and then removing the stickers.


I hope the beautiful fall colors and weather find you wherever you are and continue to inspire you to create this weekend. Happy crafting!

Friday, September 16, 2011

Happy Fall Y'All!

Well, it's Friday and it's also time for a brand new Beary Sweet Challenge! Our new theme is Happy Fall Y'All and I'd have to say, this is a piece of cake for me because I LOVE FALL. I love the cooler temperatures and the crisp scent in the air. I love harvest time (and I do live on a farm! :)), back to school, football and the beautiful fall colors! I chose to focus on some of those colors for my card this week:


I saw this idea for a strip of circles on a card here and was so excited to try it! What a simple, classic and cute idea. So here is how I did it:

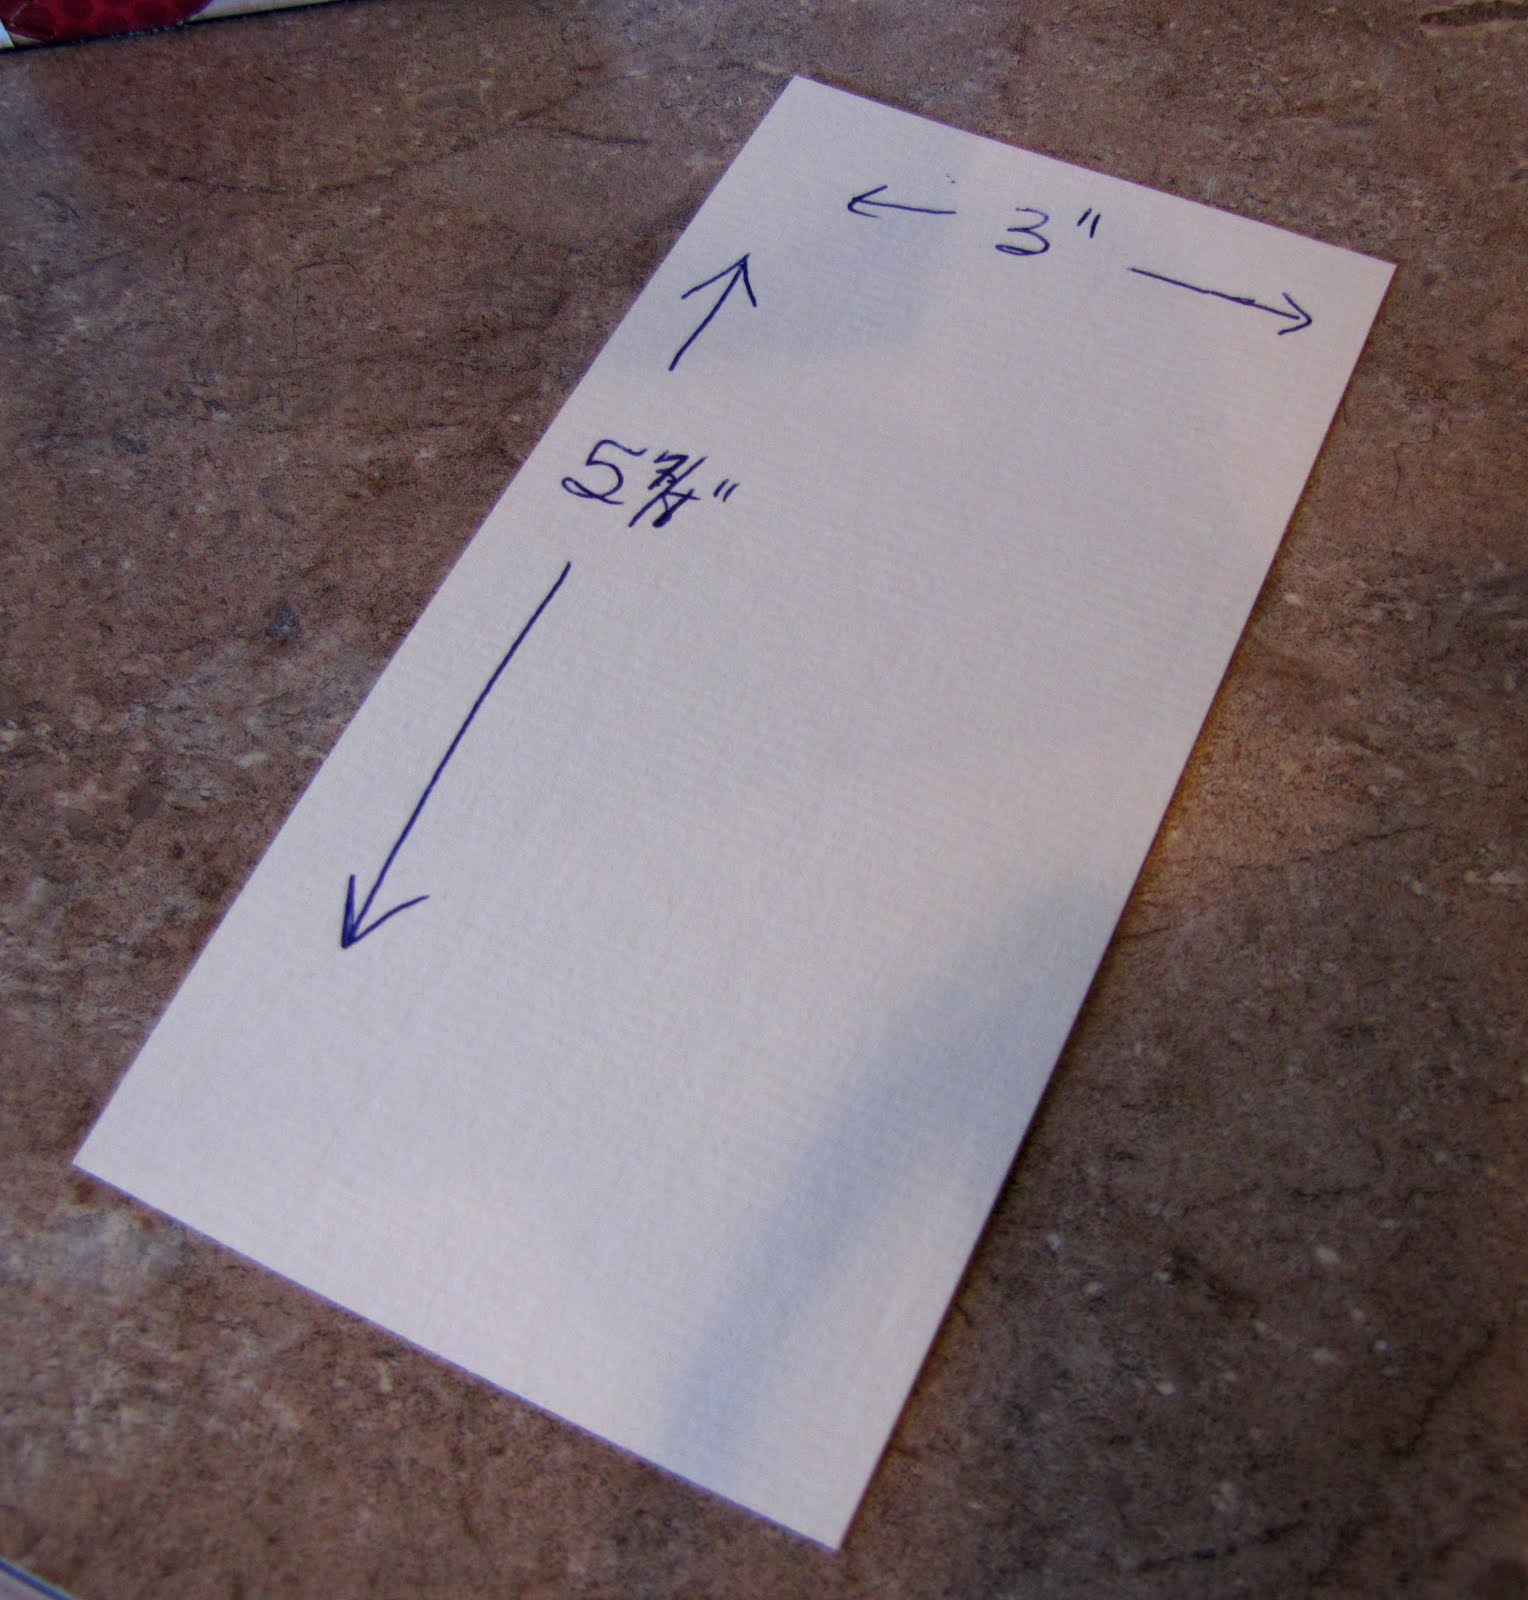
1. Cut a strip of paper 3 inches wide by 5 7/8 inches long (so it will fit on a 6 inch card base).


2. Punch 16 circles from coordinating paper and ink all the edges. I used a 1 1/4 inch circle punch and the beautiful papers from Scenic Route's Sonoma line-- these are so perfect for fall, love them!


3. Begin glueing the circles onto the cardstock strip, starting at the bottom and overhanging the edges and overlapping the circles as you move up. I laid all the circles out on the cardstock without glue first to get the feel of where they should go.


4. Continue until you have used all 16 circles, the top ones will hang over the edge quite a way, that is fine!

5. Turn the whole thing over and trim the edges of the overhanging circles so they are even with the cardstock strip. Then ink around the edges of the whole piece.

.
There you are! The strip of circles is finished and ready to adhere to a card. I zigzagged stitched mine to another piece of cardstock 5 7/8 x 5 7/8 and then attached that to my 6 inch card. My word is a custom made vinyl applique that was actually for another project but has just been sitting around my work table and fit here perfect!

I can't wait to see your Fall creations, make sure to enter them in our new challenge for your chance to win!

Friday, September 9, 2011

Trucks are not Girly, Right?

Happy Friday everyone! At The Beary Scrap this week, we are using our current sketch and trying to make anything that is "not girly." Here is my attempt at something "not girly"-- I love to put flowers, bling, ribbon and lace on everything and so it was hard to come up with something not girly. But I think my masculine birthday card based on our current sketch came out pretty well-


While trying to decide what to do I had a sudden flash of this green pickup that I had seen on the Country Drive from Echo Park stickers and knew that would be the focus of my card. There are a lot of colors in this paper line but I stuck with just red, green and blue for my boy colors.

I popped up my pickup truck with some foam squares and then filled up the back with "Happy Birthday" strips. I couldn't resist putting just a little Stickles glitter glue on it for some detail and a few green hearts off the same sticker page as the pickup. (Hearts can be on a guy card, right?)


Have a great weekend and be sure to enter our sketch challenge for your chance to win!

Friday, September 2, 2011

Brothers

We have a brand new sketch to play with over at The Beary Scrap this week:


My project using the sketch is as 12 x 12 layout using these great Windsor papers from SEI. I thought the colors perfectly complemented the sepia pictures of my boys together.


I wanted to include many of the beautiful patterns from this paper line and so I pieced together the background of my layout instead of using just one large paper. I left off the flowers in the top left hand corner as this is a boyish layout (although I do think these papers are not what you would call traditional "boy" papers-- just goes to show you can use anything!). So instead of the flowers, I used a chipboard flourish that I first inked and then spritzed with Glimmer Mist. I really love how the whole thing came together and I will definitely be using these papers again! (I'm thinking beautiful for fall wedding cards!)

I can't wait to see what you make with the sketch so get those entries coming, check out all the details of our challenge here!

Friday, August 12, 2011

Are you a . . . .


BRAVE GIRL?


Well, sometimes I am and sometimes I'm not, just depending on what it is. But I know one thing for sure, I was nowhere near as brave when I was a little girl as my 7 year old daughter is. She'll try anything and shows no fear (and yes, I definitely realize this may not always be a good thing!) She is up for adventure of any kind and I have spent many moments this summer cringing as she rides her bike down hills, does front flips off the high dive at the city pool, being pulled on a tube behind a boat on the lake and her new love-- waterskiing-- which is the subject of my layout this week.


I am pretty sure I was at least 12 years old before I attempted to waterski, but not my daughter-- she outshone her older brother and several cousins by learning this summer and her usual comment was "Go faster." What a girl!


I stuck to the basic sketch for this layout but wanted to mix it up just a little from last week and so I tilted the sketch a different direction and then added three smaller pictures to the side of my main image. I used the fabulous new collection from Echo Park called Splash-- you have got to check it out! Kimm just got it in the store this week and it is perfect for summer activities of many kinds. I just love the bright colors. I did add some hot pink in the mat for my main photo and the letter stickers to make it a little more "girly." I used Element Stickers from the Splash collection pack to accent my page instead of the flowers on the original sketch and added Stickles for a little shine to my wave.


So go on, be a brave girl and do something a little adventurous this weekend! Or just spend a little time crafting and enter your take on our sketch in our current Beary Sweet Challenge.

Friday, August 5, 2011

New Sketch at The Beary Scrap

Happy Friday to everyone out there! I hope you have enjoyed seeing the absolutely FANTASTIC creations the Beary Sweet ladies have offered up this week in conjunction with our new sketch challenge. We can't wait to see how you interpret the sketch!

My take on the sketch is a 12 x 12 layout using My Mind's Eye Fine & Dandy True Blue papers. I think these papers include some of my favorite color combinations ever and they were perfect for a picture of my 4 year old celebrating his birthday.


I loved this sketch and pretty much stuck right to it, except for substituting stars for the flowers since this is a boy-ish layout. All the accents are from the same Fine & Dandy collection-- buttons, brad, and trim-- I love it when they all come matched already!

Check out all the details for our current Beary Sweet Challenge featuring this sketch here-- we hope to see your entry soon!

Friday, July 22, 2011

Beary Scrap Closet Inspiration

Just not my closet! It is our second week of "Find Inspiration in Your Closet" over at The Beary Scrap Challenge Blog. For my project this week, I decided to go a little different route with the clothing inspiration and use an article of clothing in the pictures I wanted to scrap as inspiration for my page.


I wanted to scrap my son's 4 year old portraits and so I took the shirt that he was wearing and scanned it on my scanner, printing out my own designer paper to use on my layout. This saved me a ton of time searching through my stash looking for just the right colors to match the pictures-- the paper was already perfect!


For other papers I did stick to the main colors in the plaid print and also added some buttons that look just like the ones on his shirt.


I hope you will all take the Inspiration from Your Closet Challenge and show us what you come up with . Enter your project in our current Beary Sweet Challenge by July 31 11:59 EST for you chance to win!

Friday, April 1, 2011

Our New Challenge Sketch

Welcome to a brand new challenge at The Beary Scrap-- I am so excited to be the first DT to show off our new sketch! Here is the sketch:


And here is my take, using some fun pictures from when my daughter lost a tooth paired with these gorgeous papers from Graphic 45. I cut some of the papers apart and then used foam tabs to pop up some of the flowers and a fairy.


A close up of my 3D embellishments, complete with lots of Stickles!


I am also entering my layout in the following challenges:

Pile it On-- #13 Cutie Patootie
Tuesday Throwdown-- Florals
The Kraft Journal-- Flowers
ABC Challenges-- R is for Flowers


We want to see your take on this sketch too, whether it be for a layout, a card or any other project you can dream up! Enter your project at our DT blog between now and April 14th at 11:59 EST for a chance to win a Beary Scrap voucher.

Thursday, March 10, 2011

Happy Birthday to My Blog!

It has been just over a year since I started my blogging adventure and I am celebrating with some blog candy up for grabs!!


My candy includes:

22 6x6 cardstock sheets My Mind's Eye Laundry Line
4 pkgs rubons My Mind's Eye Laundry Line
9 diecuts titles and tags My Mind's Eye Laundry Line
9 adhesive chipboard elements My Mind's Eye Laundry Line
10 velvet flowers by 7 Gypsies
7 yds assorted ribbons
2 Acrylic Stamps by Studio G
3 Decorator Pins
Assorted buttons and embellishments


To be eligible for my candy, please do the following:
1. Become a follower of my blog.
2. Also become a follower of our Beary Scrap Design Team Challenge Blog.
3. Post the candy on your blog, either in a post or on your sidebar with a link back to this page.
4. Leave me a comment.

This candy will be open until 11:59 MST on March 31 and I will announce the random.org winner on Monday April 3rd.

If you want more chances to win great prizes this month, be sure to visit our Beary Scrap Design Team and Challenge Blog for details on the 5 incredible Birthday Presents we are giving away to celebrate our 1st Birthday!

Friday, February 4, 2011

2D Sketch-- 3D Frame

Happy Friday everyone! It's a new sketch at The Beary Scrap this week and so I have a new project to show you. I have wanted for awhile to try using one of our Beary Sweet sketches to make something other than a layout or card. I just wondered how that would work but couldn't quite wrap my mind around it until this week-- then I finally found the perfect thing and sketch to try it out on!

And so here is my altered frame, with the right hand side being taken from the sketch.


First I painted the edges of the frame black with craft paint. Then I covered each side with paper from My Mind's Eye. I absolutely love these colors, and they just happen to match my bedroom perfectly, which is where I will be putting this little frame. I adhered the paper with good old glue stick but put a coat of glue on both the wood frame and on the back of the paper to ensure a good old.

Here's a view from the top so you can see the painted edges:


And here's a view of just the right hand side, which is based on the actual sketch, though I flipped it the other direction so that my bow would be at the far right edge. I added some pearls in the top corner and made my bow out of ribbon and tulle with a decorative pin through the middle.


And there you have it, my experiment on converting a 2D sketch into a 3D project. I'd love to know what you think! And I'd love to see your take on the sketch so make sure to join our current Beary Sweet Challenge .

Friday, January 14, 2011

Sketch Round 2 at The Beary Scrap

Here is my version 2 of our current Beary Sweet Challenge Sketch, this time with something "NEW" added to keep it interesting. This was a great sketch to work with and perfect for my daughter Lindsey's 7 year old portrait (isn't she cute? I know, I am biased!)

Last week I showed you the new My Mind's Eye Fine & Dandy True Blue line and this week I used the other side of the line, Tickled Pink, and I love these papers just as much as the boy ones! The colors are really bright and fun, plus they have that little bit of brown that is my go-to color. The embellishments include chipboard stickers and borders, awesome trims, brads, gems and the darling layered stickers (check out that bird in the upper left-hand corner, so cute!) This is a collection you just have to have-- girl or boy or both!


For my something "NEW," I have used some fabric on my layout. This is not something I do-- I do not like sewing very much and do not even have very much fabric so this was definitely new for me! I decided to make some "Yo-yos" to put on my layout and even though I know these have been around forever, I still want to give you a few instructions on how to do it, in case this is "NEW" for you too!


First, cut out a circle that is about double the size of what you want it to be when you are done-- you can trace a circle template onto fabric but trust me, it does not have to be a perfect circle because you are going to gather up all the edges anyway. So I just free hand cut mine and it worked great!


Next, use a needle and thread (a good strong thread that won't break when pulled) and take a running stitch all the way around the outside of the circle, working on the right edge of the fabric, with the back side facing down.


Now you pull your thread to gather in all the edges, it starts to look kind of like a tiny shower cap. Pull the thread tight until there is not a hole in the middle and then tie it off.


Finally, press the center of the "yo-yo"down flat with the now closed up hole in the center. Embellish the center with buttons, brads, jewels or whatever else you can think of!


That's it! Now you have a cute flower "yo-yo" to place on any layout or card. Adhere it with a strong adhesive such as Alene's Tacky Glue.


If you'd like to make a creation based on our sketch, you still have a little bit of time left to join our challenge, so link up your project at our Design Team Blog by 11:59 EST TONIGHT for your chance to win a voucher to The Beary Scrap!

Friday, December 3, 2010

A Beary Sweet Snowflake Sketch!

I'm dreaming of a WHITE CHRISTMAS-- and my fellow Beary Scrap DT member, Susan, must have read my mind as she has provided our DT with such a great way to start off to December, with this very sweet sketch, complete with lovely snowflakes and swirls for a wintry day. (Though you could substitute anything you want for those snowflakes!) I was so excited to work with this great sketch.


I used the new Midnight Frost line from Bo Bunny and some of my Christmas morning pictures from last year (no, they are not all scrapbooked yet, I better hurry up before I have new Christmas morning pictures!). I rotated my sketch clockwise 45 degrees and came up with this single 12 x 12:


These Midnight Frost papers are gorgeous-- with dark blues, purples and greys and already have those great swirls worked right into the pattern. I used both dark blue (Faded Jeans) Distress Ink from Tim Holtz and silver ink to edge all of my papers and even used my brand new Marth Stewart around the edge Snowflake punch for one of them. These punches are really fun and add so much. They are also very easy to use!

To add the swirls from the sketch, I traced some swirls on using a stencil and then handstitched them which did take a bit longer but I think was definitely worth the time, I love how they turned out!


Now it's your turn, please join us at The Beary Scrap Design Team and Challenge Blog, and use this sketch to create your own project to enter in our current challenge, which goes from now until 11:59 EST on Dec. 14th. Your project just might win you a voucher to The Beary Scrap online store!

Friday, November 19, 2010

Anything Goes-- So, what could be better than. . . .

A NEW BABY!!

Not much, in my opinion! Remember a few weeks ago, when I told you all why I was really a Halloween witch and I was hoping for my new niece to join my Halloween birthday celebration? Well, she didn't quite make it then but here she is now and the perfect subject for my Anything Goes page this week at The Beary Scrap DT.


I wanted to use fall leaves since this little cutie was born November 7th, but still make this look like a baby page. So I used papers from the My Mind's Eye Lost & Found Market Street line which have soft creams, blues and pinks. I used a Martha Stewart punch to make all my fall leaves, throwing in some browns from Bo Bunny Double Dot cardstock.


I spritzed all my leaves with Tattered Angels Glimmer Mist in Opal and then added Cinnamon Stickles to some of the edges and some pink KaiserCraft rhinestones. My title letters are cut on my Cricut (Jasmine cartridge) and also spritzed with Glimmer Mist.


I LOVE how my page turned out and I can't wait to see what you've got to show us in our Anything Goes challenge so make sure to join us in the current Beary Sweet Challenge for your chance to win some goodies from the Beary Scrap!