Thanks so much for stopping by and visiting. Hope you find something to make your creativity bloom!

Friday, September 23, 2011

Buttons & Pumpkins

It's Week 2 of our current Beary Sweet Challenge, "Happy Fall Y'All" and the DT challenge this week was to add buttons to our Happy Fall projects. I decided I wouldn't add just a button or two, but a whole barrel full!


Or at least an entire pumpkin full! The center of my card is a pumpkin made from buttons.


To start with I found a pumpkin pattern, (you can get your own copy by clicking here), traced it onto Bo Bunny Double Dot Burnt Orange cardstock and cut it out. Then I used Tacky Glue and adhered all shades and sizes of orange buttons to my pumpkin. This is a little tricky and I found it worked the best to just put glue on a small area, find buttons to fit and then move on to the next area, adjusting as I went. Once my pumpkin was dry I could then mount it to my card.
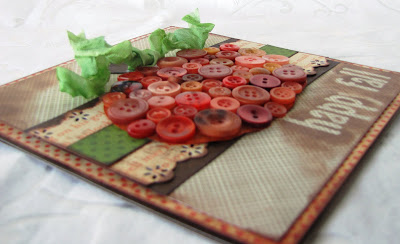

For my card I used some of the awesome new papers from Authentique's Glowing line. I love all their 6 x 6 paper pads, make sure to check out these new arrivals in the Beary Scrap store. I made my sentiment by applying letter stickers, inking over the top with an ink dauber and then removing the stickers.


I hope the beautiful fall colors and weather find you wherever you are and continue to inspire you to create this weekend. Happy crafting!

Friday, September 16, 2011

Happy Fall Y'All!

Well, it's Friday and it's also time for a brand new Beary Sweet Challenge! Our new theme is Happy Fall Y'All and I'd have to say, this is a piece of cake for me because I LOVE FALL. I love the cooler temperatures and the crisp scent in the air. I love harvest time (and I do live on a farm! :)), back to school, football and the beautiful fall colors! I chose to focus on some of those colors for my card this week:


I saw this idea for a strip of circles on a card here and was so excited to try it! What a simple, classic and cute idea. So here is how I did it:

1. Cut a strip of paper 3 inches wide by 5 7/8 inches long (so it will fit on a 6 inch card base).


2. Punch 16 circles from coordinating paper and ink all the edges. I used a 1 1/4 inch circle punch and the beautiful papers from Scenic Route's Sonoma line-- these are so perfect for fall, love them!


3. Begin glueing the circles onto the cardstock strip, starting at the bottom and overhanging the edges and overlapping the circles as you move up. I laid all the circles out on the cardstock without glue first to get the feel of where they should go.


4. Continue until you have used all 16 circles, the top ones will hang over the edge quite a way, that is fine!

5. Turn the whole thing over and trim the edges of the overhanging circles so they are even with the cardstock strip. Then ink around the edges of the whole piece.

.
There you are! The strip of circles is finished and ready to adhere to a card. I zigzagged stitched mine to another piece of cardstock 5 7/8 x 5 7/8 and then attached that to my 6 inch card. My word is a custom made vinyl applique that was actually for another project but has just been sitting around my work table and fit here perfect!

I can't wait to see your Fall creations, make sure to enter them in our new challenge for your chance to win!

Friday, September 9, 2011

Trucks are not Girly, Right?

Happy Friday everyone! At The Beary Scrap this week, we are using our current sketch and trying to make anything that is "not girly." Here is my attempt at something "not girly"-- I love to put flowers, bling, ribbon and lace on everything and so it was hard to come up with something not girly. But I think my masculine birthday card based on our current sketch came out pretty well-


While trying to decide what to do I had a sudden flash of this green pickup that I had seen on the Country Drive from Echo Park stickers and knew that would be the focus of my card. There are a lot of colors in this paper line but I stuck with just red, green and blue for my boy colors.

I popped up my pickup truck with some foam squares and then filled up the back with "Happy Birthday" strips. I couldn't resist putting just a little Stickles glitter glue on it for some detail and a few green hearts off the same sticker page as the pickup. (Hearts can be on a guy card, right?)


Have a great weekend and be sure to enter our sketch challenge for your chance to win!

Friday, September 2, 2011

Brothers

We have a brand new sketch to play with over at The Beary Scrap this week:


My project using the sketch is as 12 x 12 layout using these great Windsor papers from SEI. I thought the colors perfectly complemented the sepia pictures of my boys together.


I wanted to include many of the beautiful patterns from this paper line and so I pieced together the background of my layout instead of using just one large paper. I left off the flowers in the top left hand corner as this is a boyish layout (although I do think these papers are not what you would call traditional "boy" papers-- just goes to show you can use anything!). So instead of the flowers, I used a chipboard flourish that I first inked and then spritzed with Glimmer Mist. I really love how the whole thing came together and I will definitely be using these papers again! (I'm thinking beautiful for fall wedding cards!)

I can't wait to see what you make with the sketch so get those entries coming, check out all the details of our challenge here!