When Susan told me the theme for this week, I knew immediately what I wanted to fold! My layout this weeks takes you Into the Woods with some complicated-looking but easy-to-make pine trees that work perfect on a camping, nature or even Christmas layout or card.

To make your trees, cut squares in descending half inch sizes ( 4", 3 1/2 ", 3", 2 1/2" etc.) out of a LIGHTWEIGHT patterened paper-- cardstock or cardstock weight patterned paper will not work as well. Begin by folding your first square directly in half, unfold and fold in half again the opposite direction.

Unfold, you should now have a square with crease lines as shown below-- I have traced over mine with a pen to make sure they show up in the photo.

Now fold you squared diagonally to make a triange; unfold and repeat in the opposite direction.
Now your crease lines should look like this:

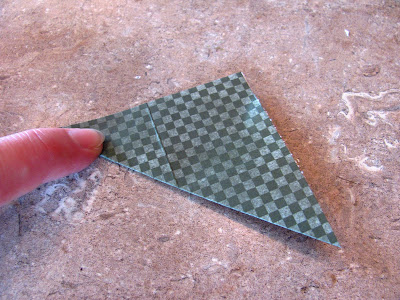
Fold the square directly in half again along one of the previous crease lines and then carefully fold both sides in toward the middle to make a triangle that looks like this.

Then you will need to fold in each side of the triangle into the middle to a point like this:
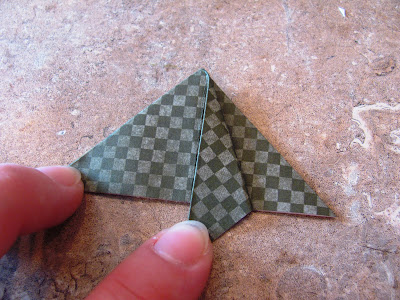
Place a glue dot in the inside of the larger triangle and in the small folded tip to hold it.

Repeat with your other squares, doing as many as you want to make a tree. You can start with squares as large as you want and go up as many layers as desired to get the size of tree right for you. Just experiment and see what you like best. After finishing my triangles I inked all the edges with Tim Holtz Distress Ink in Pine Needles to make it stand out a little more and then adhered the tree, triangle by triangle, to my page. As I went up, I angled each triangle a bit so it didn't look to straight as, of course, no real trees truly are.

To make the page to go with my easy-to-fold evergreen trees, I used a light brown Bazzill cardstock that I trimmed to 10 x 10. I used letter stickers to spell out my titles on the Bazzill and then spritzed around the letters and other edges with Tattered Angels Glimmer Mist in Clover -- this spray is seriously the most gorgeous green color I have ever seen and it's a limited edition so make sure and snatch some up before it's gone! After letting it dry a few minutes, I peeled off the stickers and threw them away, leaving the title behind in the mist. This is a cool way to title your page and a different way to use your letter stickers. Notice my stickers below don't even all match-- I had the same alphabet in several colors and I used them all to make my title since I was out of certain letters in some of the colors.

After letting the cardstock dry thoroughly I machine stitched it onto some Yellowstone National Park patterned paper, adhered all my pine trees and added my pictures. The pictures are all matted with Bo Bunny Double Dot cardstock-- this paper is so nice!! It has amazingly rich colors, the pictures on the website don't really do it justice-- I can't wait to get some more. I finished off my page with some brown polka dot brads from Doodlebug Key Lime collection and pine trees from The Eyelet Outlet.

They're amazing easy and quick, these fancy folded trees so give them a tree. I left mine plain but imagine them embellished with brads or rhinestones to look like a decorated Christmas tree or topped with Snow Tex and glitter to look like newly fallen snow!
Don't forget to try your hand at some fancy folds and enter our Challenge #2 for a chance to win a Scor Pal from The Beary Scrap and be sure to check back tomorrow for some more folded inspiration!


2 comments:
Super cute LO!! Love your trees!! Thanks for showing us how.
Jamie, thanks so much for this tutorial! I have a card I made using it up on my blog ... http://camelliacottagedesigns.blogspot.com/2011/11/two-challenges-and-special-tree.html
Thanks again, Becky!
Post a Comment